⚠️ You are viewing documentation for version: v1.6
Beagle v1.6 is no longer actively maintained. The documented version you are viewing may contain deprecated functionality. For up-to-date documentation, see the latest version .
Rendering
Read about Beagle tree data structure in order to help you understand rendering.
Every Beagle Web library has a very well defined process of how it fetches, process and renders a view. There’s an order that must always be respected and hook points where the developer can execute some code of his own (lifecycles).
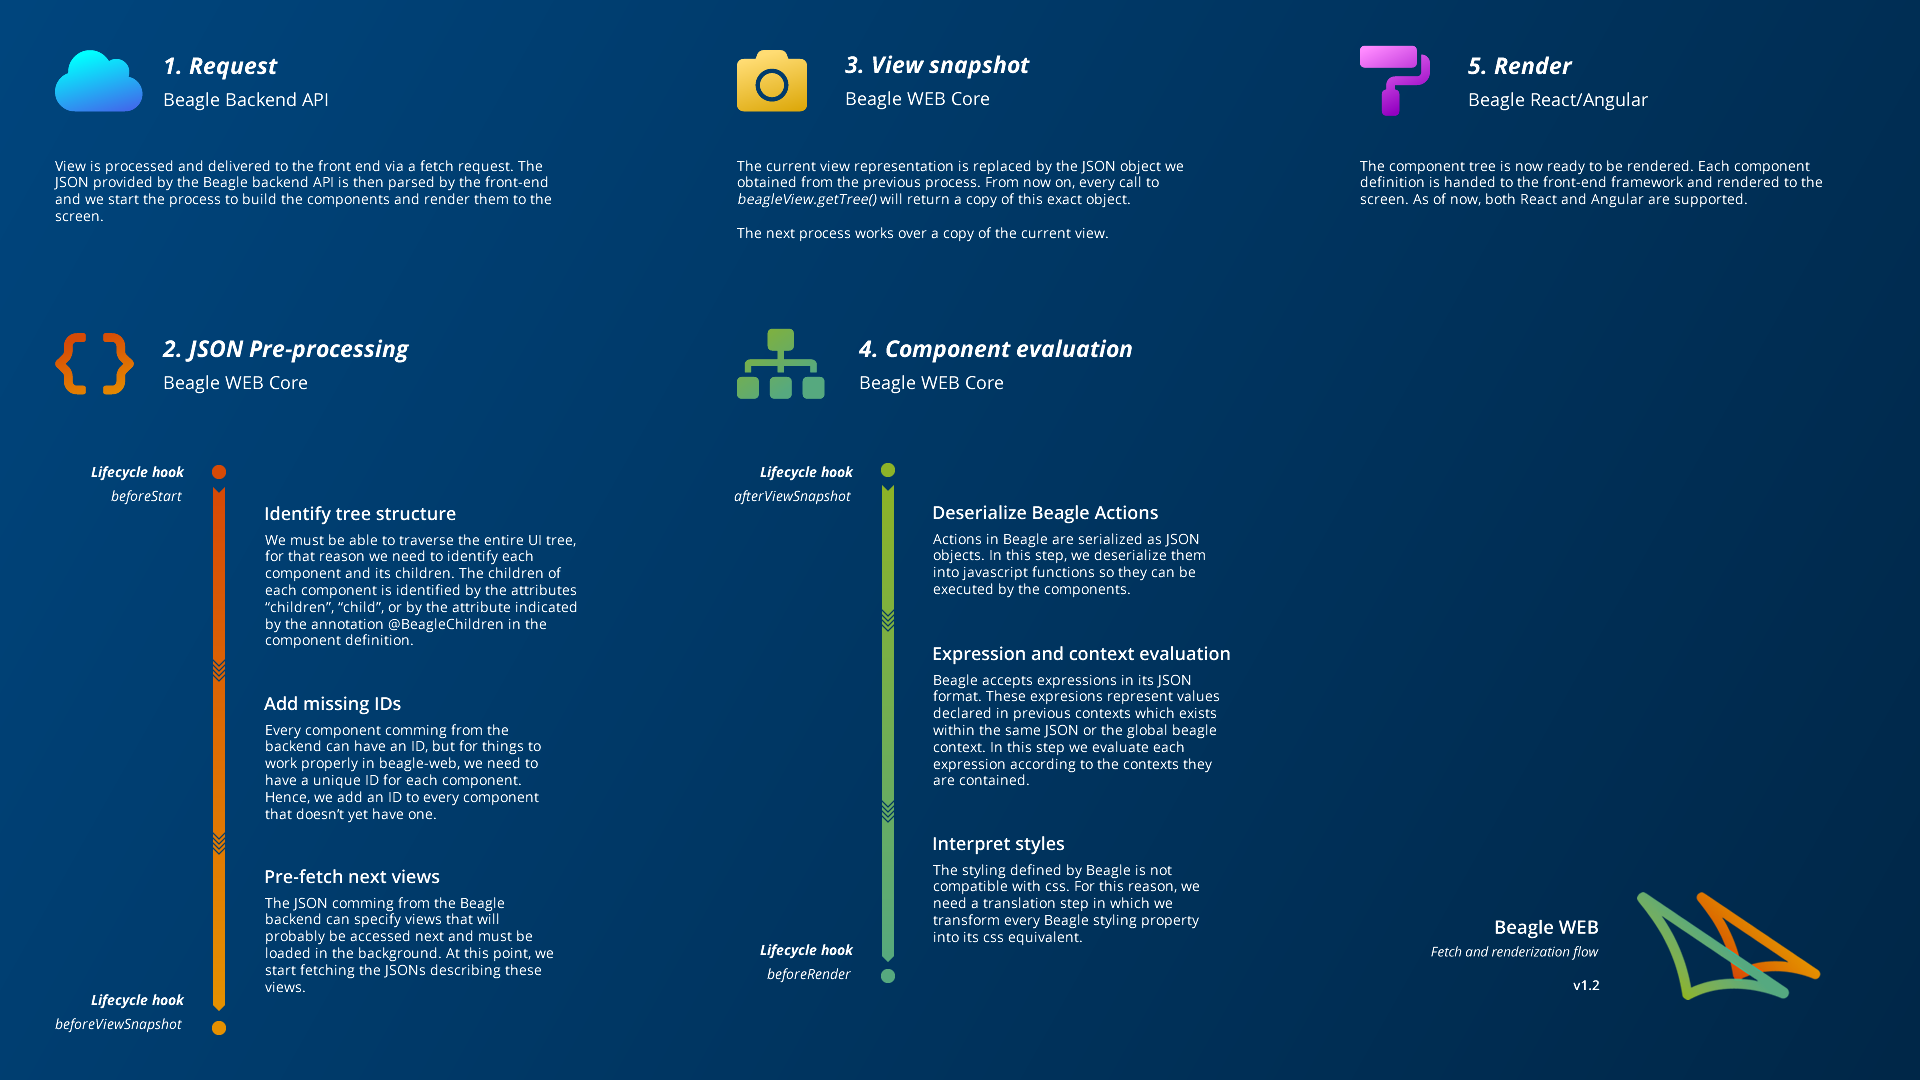
See the full rendering process of Beagle Web:
The Beagle lifecycles are:
- BeforeStart
- BeforeViewSnapshot
- AfterViewSnapshot
- BeforeRender
They can be used as global hooks to the lifecycle:
const config = {
  // ...
  lifecycles: {
    beforeStart: (payload) => {
      // ...
    },
    beforeViewSnapshot: (payload) => {
      // ...
    },
    afterViewSnapshot: (payload) => {
      // ...
    },
    beforeRender: (payload) => {
      // ...
    },
  }
}
Or local hooks to the lifecycles in a per-component basis (annotations/decorators):
// Attention: these won't work with production builds in Angular. Keep reading for more details.

@BeforeStart((textComponentPayload) => {
  // ...
})
@BeforeViewSnapshot((textComponentPayload) => {
  // ...
})
@AfterViewSnapshot((textComponentPayload) => {
  // ...
})
@BeforeRender((textComponentPayload) => {
  // ...
})
@Component({
  // ...
})
class Text {
  // ...
}
The example above won’t work with Angular when building for production, because of the Angular compiler. To write a readable code you must choose one of two options:
- Place the comment
// @dynamicbefore calling the decorator:
// @dynamic
@BeforeRender((textComponentPayload) => {
  // ...
})
@Component({
  // ...
})
class Text {
  // ...
}
- Replace the arrow function for a common function and export it:
export function beforeRender(textComponentPayload) {
  // ...
}

@BeforeRender(beforeRender)
@Component({
  // ...
})
class Text {
  // ...
}
Since annotations/decorators cannot be used for functions, if you have a functional component or if you simply don’t want to use decorators, you can use them as normal function calls:
const Table = (props) => {
  // ...
}

BeforeStart((textComponentPayload) => {
  // ...
})(Table)
It is important to notice, mainly for React, where Higher Order Components (HOCs) are common, that the component to receive the decorator must be the final component. For instance, if you want to apply a hoc named withTheme to your component:
const MyComponent: FC = () => {
  // ...
}

// This is wrong, it has no effect!
// BeforeRender(myLifecycleFunction)(MyComponent)
// export default withTheme(MyComponent)

// You need to apply the decorator to the final component instead:
const MyComponentWithTheme = withTheme(MyComponent)
BeforeRender(myLifecycleFunction)(MyComponentWithTheme)
export default MyComponentWithTheme
The return value of a lifecycle hook can be either nothing (undefined) or a tree. If it is a tree, the rendering process will discard the previous tree and start working on the tree returned by the hook.
To take control over the rendering process, besides the lifecycles, Beagle also offers the Renderer API, which can be accessed through BeagleView.getRenderer(). The BeagleView can be accessed via the BeagleRemoteView component through the attributes onCreateBeagleView, in Angular and viewRefin React.
Another way to get access to the BeagleView is through the ViewContentManager API, which can be found under this.viewContentManager in an Angular component that extends BeagleComponent; or under props.viewContentManager in a React component that implements the BeagleComponent interface.
Process and lifecycles
beforeViewSnapshot.Beagle Web has a very well defined process from when a new payload is received to the moment it gets rendered in the browser screen. We also have some “breakpoints” in this process where you do your own stuff, this is called breakpoints “lifecycles”.
Process to render a view
See below the steps to render a view:
- Run the global beforeStart hook;
- Run the beforeStart hook of each component;
- Identify the children of each component considering the decorator “BeagleChildren”;
- Assign an id to every node that doesn’t have one yet;
- Remove any properties of the object that has a null value (nulls are interpreted as inexistent in Beagle);
- If needed, pre-fetch views that could be accessed next;
- Run the global beforeViewSnapshot hook;
- Run the beforeViewSnapshot hook of each component;
- Takes a snapshot of the current tree and stores it. From now on, any reference to the current rendered tree will be referencing the copy.
- Starts processing a copy of the snapshotted view, the next lifecycles will run over this copy.
- Run the global afterViewSnapshot hook;
- Run the afterViewSnapshot hook of each component;
- Deserialize beagle actions into javascript functions;
- Evaluate contexts and expressions;
- Interpret styles, converting the Beagle styling syntax to css;
- Run the global beforeRender hook;
- Run the beforeRender hook of each component;
- Hand the component tree to the render function. This function is different in Angular and React.
Lifecycles
There are four lifecycle hooks, but you probably want to use just two of them: beforeViewSnapshot and beforeRender. The main difference between them is that the first runs before any expression or action has been evaluated and the second runs after. Also important to notice is that, when using the Renderer API, doFullRender will run both lifecycles, but doPartialRender will run only the beforeRender lifecycle.
A simple rule to decide if you want to alter the tree via beforeViewSnapshot or beforeRender is: if your modification doesn’t depend on the result of an expression, use beforeViewSnapshot otherwise usebeforeRender.
A lifecycle hook receives the Beagle Tree and returns either nothing (undefined) or a tree. If it is a tree, the rendering process will discard the previous tree and start working on the tree returned by the hook. If it’s a global lifecycle, by “tree” it means the entire Beagle Tree, if it’s a component lifecycle, by “tree”, it means the branch corresponding to the component.
Below, see detailed explanations and examples of each lifecycle:
BeforeStart
This lifecycle runs before anything else. Here it should be done modifications that must happen before any id is assigned or any children property is computed. Since it runs so early, if the payload is not at all what Beagle expects, here is the place to completely change it.
Since the children translation has not run yet, components decorated with @BeforeStart might not run at all, since they might not be considered part of the tree. Take, for instance, a text inside a component table that has its children defined by the property rows. In this lifecycle, Beagle has no idea that rows actually represents the children of table and when traversing the tree, it would ignore everything inside rows, including the text we mentioned.
This is the only lifecycle where new nodes can be added to the tree and not have ids. Every lifecycle after this is run after the ids are assigned, i.e. if they add a new node, they must also provide its id.
Examples of usage
Custom ID generator
This lifecycle can be used to ignore Beagle’s default id generation and use one of your own. Since Beagle only computes random ids for nodes without id’s, you can use this lifecycle to assign your own unique ids to every node.
const config = {
  // ...
  lifecycles: {
    beforeStart: (tree) => {
      let next = 1

      function assignIds(data: any) {
        // if it's not a component or not a structure that can have a component inside, return
        if (!data || typeof data !== 'object') return
        // if it's an array, assign ids to the components inside
        if (Array.isArray(data)) return data.forEach(assignIds)
        // if it is a component node, assign an ID
        if (data._beagleComponent_) data.id = `myAppID-${next++}`
        // if it's an object, assign ids to the components inside
        const keys = Object.keys(data)
        keys.forEach(key => assignIds(data[key]))
      }

      assignIds(tree)
    }
  }
}
Complex children calculation
Another use case would be complex children calculations. Let’s say the children of a table component is actually the union of three properties: header, rows and footer. This cannot be expressed via the decorator @BeagleChildren and is not at all what Beagle expects. This lifecycle could be used to remove these properties from the original JSON and create the property children, which would be the union of the three.
import { BeforeStart } from '@zup-it/beagle-web'

@BeforeStart((table) => {
  table.children = [header, ...rows, footer]
  delete table.header
  delete table.rows
  delete table.footer
})
class Table {
  // ...
}
The code above works only if every other component has children as the name of the property that represents its children. If this is not the case, a global lifecycle should be used instead.
This feature could also be implemented using BeforeViewSnapshot, but, in this case, you’d have to assign id’s to every node inside the new property children, since in BeforeViewSnapshot the ids have already been assigned. See the example here.
BeforeViewSnapshot
Runs just before the view snapshot, useful to alter the payload, but after the ids were already assigned. This is where you should do most of your modifications to the tree, since id’s have already been assigned and the tree structure is ready to be traversed.
The only thing we must be aware of is: if we create any new node, we must assign an id to it.
Example of usage
Writing a shortcut to control text-inputs
The component beagle:textInput can be controlled through a context. Let’s see an example where the value of the input “email” is controlled by the context property email.address and the input “message” is controlled by the context property email.message.
{
  "_beagleComponent_": "beagle:container",
  "context": {
    "id": "email",
    "value": {
      "address": "",
      "message": ""
    }
  },
  "children": [
    {
      "_beagleComponent_": "beagle:textInput",
      "placeholder": "E-mail",
      "value": "@{email.address}",
      "onChange": [
        {
          "_beagleAction_": "beagle:setContext",
          "contextId": "email",
          "path": "address",
          "value": "@{onChange.value}"
        }
      ]
    },
    {
      "_beagleComponent_": "beagle:textInput",
      "placeholder": "Message",
      "value": "@{email.message}",
      "onChange": [
        {
          "_beagleAction_": "beagle:setContext",
          "contextId": "email",
          "path": "message",
          "value": "@{onChange.value}"
        }
      ]
    },
  ]
}
It is possible to add a shortcut. Let’s say whenever the JSON brings the property model you create the entire structure automatically? In model, it must be typed which value in the context will control the input. Let’s see the same example, but now using this new property model.
{
  "_beagleComponent_": "beagle:container",
  "context": {
    "id": "email",
    "value": {
      "address": "",
      "message": ""
    }
  },
  "children": [
    {
      "_beagleComponent_": "beagle:textInput",
      "placeholder": "E-mail",
      "model": "email.address"
    },
    {
      "_beagleComponent_": "beagle:textInput",
      "placeholder": "Message",
      "model": "email.message"
    }
  ]
}
Much simpler, right? But for this to work, you still need to write the lifecycle that will transform model to the expected structure.
import { BeforeViewSnapshot } from '@zup-it/beagle-web'

@BeforeViewSnapshot((component) => {
  component.value = `@{${component.model}}`
  component.onChange = component.onChange || []
  const [contextId, ...path] = component.model.split('.')
  component.onChange.push({
    _beagleAction_: 'beagle:setContext',
    contextId,
    path: path ? path.join('.') : undefined,
    value: "@{onChange.value}"
  })
})
@Component({
  // ...
})
class TextInput {
  // ...
}
With this code, despite receiving model from the backend, the payload processed by Beagle will have the expected values.
This example might not have worked if it was placed under the lifecycle BeforeStart. This is because, at this time, the children wouldn’t have been interpreted yet. Let’s say we had a component custom:table where the children is placed under the property rows and inside one of the rows there was a beagle:textInput. The property model wouldn’t be transformed for this particular text input, because, by this time (BeforeStart), Beagle still has no idea that rows are the children of a custom:table and the beagle:textInput would’ve been inaccessible.
Complex children calculation with BeforeViewSnapshot
The example from the previous lifecycle (BeforeStart) could also have been done here without the danger of skipping the component’s lifecycle due to a children property named incorrectly. The only difference is that we’d must assign the ids ourselves:
import { BeforeViewSnapshot, Tree, Component } from '@zup-it/beagle-web'

@BeforeStart((table) => {
  table.children = [header, ...rows, footer]
  delete table.header
  delete table.rows
  delete table.footer
  // assigns a random id for each component in the tree table.children
  Tree.forEach(table.children, Component.assignId)
})
class Table {
  // ...
}
AfterViewSnapshot
When using the Renderer API you have two different types of render: full renders and partial renders. The two previous lifecycles will run only in full renders, while this lifecycle and the next runs on both full and partial renders.
Differently from the two previous lifecycles, the changes done here are valid for the current render only. Since any update to the view is done over a tree based on the snapshotted view, the modifications done in this lifecycle are not permanent and will be executed in every render. For instance, if we have a property counter with the value 0 in the tree and in our lifecycle we increment counter by 1. In the 5th full render these would be the values for counter depending on which lifecycle was used:
- BeforeStart: 5
- BeforeViewSnapshot: 5
- AfterViewSnapshot: 1
- BeforeRender: 1
This lifecycle can be used to run code that needs to run every time the view is rendered but doesn’t require actions, context, expressions and styles to have already been processed.
Example of usage
Contexts are defined, referenced and manipulated in the JSON of the view. But what if you want to access data of the application and not the view itself? Beagle offers a feature called “Global context” that is able to deal with this scenario, but suppose there is no Global context, you can still implement this behavior by using the AfterViewSnapshot lifecycle.
Let’s say you have a financial application and you want to show the user’s balance. You need to guarantee that, in every re-render, the most recent value for the balance will be used.
{
  "_beagleComponent_": "container",
  "context": {
    "id": "user",
    "value": {
      "name": "",
      "balance": 0
    }
  },
  "children": [
    {
      "_beagleComponent_": "text",
      "text": "@{user.name}, your balance is $@{user.balance}"
    }
  ]
}
In the JSON above, use the context user, where it starts with empty values and the view has no way of knowing the correct values. Now, replace the values of the context in the JSON by the values you have in your application. See the example below:
import Tree from '@zup-it/beagle-web'

function findContextById(tree, id) {
  const it = Tree.iterator(tree)
  let next = it.next()
  while (!next.done) {
    const component = next.value
    if (component.context && component.context.id === id) return component.context
    next = it.next()
  }
}

const config = {
  // ...
  lifecycles: {
    afterViewSnapshot: (payload) => {
      const userContext = findContextById(payload, 'user')
      const userData = getUserData() // this method gets the user data from the application
      userContext.name = userData.name
      userContext.balance = userData.balance
    }
  }
}
The code above tells Beagle to replace the values in the context “user” by the values in the application. This piece of code cannot be placed before the view is snapshotted because we have the requirement to update the balance value in every render. It also can’t be placed in the next lifecycle (BeforeRender), because the context would then be already evaluated and our values wouldn’t be processed.
It is important to notice that the action setContext would not work over the context user, since you are always replacing the values for this context before processing any expression. This is just an example to show how this lifecycle could be used. To use application values in your Beagle view, it is always preferred to use the global context.
BeforeRender
The changes here are valid for the current render only and is executed in every render. The difference from BeforeRender to AfterViewSnapshot, is that it is guaranteed that all actions, expressions and styles have already been processed.
Example of usage
When the backend decided to express colors in the following format: { red: number, green: number, blue: number }. For example, black would be { red: 0, green: 0, blue: 0 }. This is not a valid color for browsers, so we decide to convert the value of every color property to a valid RGB format. Basically, the function that could do this work is the following:
const colorProperties: ['color', 'backgroundColor', 'borderColor']

function fixColorCodes(componentPayload) {
  const style = componentPayload.style
  if (!style) return
  colorProperties.forEach((property) => {
    if (!style[property]) return
    style[property] = `rgb(${style[property].red}, ${style[property].green}, ${style[property].blue})`
  })
}
Now, just need to run the function above for every component in the tree. If you want to have a dynamic behavior for the color by changing it via the context feature, check the JSON below:
{
  "_beagleComponent_": "beagle:container",
  "context": {
    "id": "bgColor",
    "value": {
      "red": 255,
      "green": 255,
      "blue": 255
    },
  },
  "children": [
    {
      "_beagleComponent_": "beagle:text",
      "text": "My dynamically colored text",
      "style": {
        "backgroundColor": "@{bgColor}"
      }
    },
    {
      "_beagleComponent_": "beagle:button",
      "text": "red",
      "onPress": [
        {
          "_beagleAction_": "setContext",
          "contextId": "bgColor",
          "value": {
            "red": 255,
            "green": 0,
            "blue": 0
          }
        }
      ],
      "_beagleComponent_": "beagle:button",
      "text": "green",
      "onPress": [
        {
          "_beagleAction_": "setContext",
          "contextId": "bgColor",
          "value": {
            "red": 0,
            "green": 255,
            "blue": 0
          }
        }
      ],
      "_beagleComponent_": "beagle:button",
      "text": "blue",
      "onPress": [
        {
          "_beagleAction_": "setContext",
          "contextId": "bgColor",
          "value": {
            "red": 0,
            "green": 0,
            "blue": 255
          }
        }
      ]
    }
  ]
}
The text starts with a white background and as soon as the user presses a button, the background color changes.
If you call fixColorCodes before the context is evaluated, it will be trying to run with the string @{bgColor} instead of the object { red: 255, green: 255, blue: 255 } which will get you a massive runtime error, since red, green or blue are not properties of a string.
BeforeStart, BeforeViewSnapshot and AfterViewSnapshot run before the context gets evaluated, so everything that might be affected by the context, must be executed in the last lifecycle: BeforeRender.
import { Tree } from '@zup-it/beagle-web'

const config = {
  // ...
  lifecycles: {
    // ...
    beforeRender: tree => Tree.forEach(tree, fixColorCodes),
  }
}
The Renderer API
For fine control of the rendering process, Beagle also let you manage when to render a new tree to your Beagle View. You can have a component, that when clicks changes the current Beagle Tree, so a new component is added or a property is modified.
A common scenario is when you need to create an action that modifies the current tree. Take for example the action addChildren, when executed, it must get the current tree and add the given children to the component with the given id. To do it, we must have a way to get the current tree, modify it and tell the Beagle View to render it again.
A renderization can be one of two processes: a full renderization or a partial renderization. The first runs all steps of the renderization (1 to 8 in this list). The second executes only the view snapshot and the steps after it (9 to 18 in this list).
Accessing the Renderer
Each Beagle View has its renderer, to get access to it, you must call beagleView.getRenderer().
See examples of how to get the renderer:
- In React: a reference to the
BeagleViewcan be obtained through the propertyviewRefof theBeagleRemoteView:
import React, { FC, useRef, useEffect, MutableRefObject } from 'react'
import { BeagleRemoteView } from '@zup-it/beagle-react'
import { BeagleView } from '@zup-it/beagle-web'

const Home: FC = () => {
  const beagleView = useRef() as MutableRefObject<BeagleView | undefined>

  useEffect(() => {
    if (beagleView.current) {
      const renderer = beagleView.current.getRenderer()
    }
  }, [])

  return (
    <BeagleRemoteView path="/home" viewRef={beagleView} />
  )
}
- In Angular: you can use the attribute
onCreateBeagleViewof thebeagle-remote-viewcomponent:
import { Component } from '@angular/core'
import { LoadParams, BeagleView } from '@zup-it/beagle-web'

@Component({
  selector: 'home',
  template: '',
})
export class Home {
  loadParams: LoadParams
  private beagleView: BeagleView

  constructor() {
    this.loadParams = { path: '/home' }
  }

  onCreateBeagleView(beagleView: BeagleView) {
    this.beagleView = beagleView
  }

  getRenderer() {
    return this.beagleView && this.beagleView.getRenderer()
  }
}
When inside a component rendered by Beagle, you can use the ViewContentManager to get the BeagleView and obtain access to the renderer.
When inside an action handler (custom actions), Beagle View is provided via parameter, which can be used to get the renderer. See the example below:
const MyCustomActionHandler: ActionHandler<MyCustomAction> = ({ action, beagleView }) => {
  const renderer = beagleView.getRenderer()
  // ...
}
Using the Renderer
The renderer has only two functions: doFullRender and doPartialRender.
doFullRender: renders the tree passed as parameter by running all rendering steps over it. Full renders must be done every time new nodes are createddoPartialRender: it only runs the view snapshot and the steps after that. Partial renders should be used to modify existent nodes.
The tree received by doFullRender is of type BeagleUIElement, for example, it might or not have ids. The tree received by doPartialRender is of type IdentifiableBeagleUIElement:
Example: it must have ids for every node. You can never pass a tree to doPartialRender with missing ids.
Besides the type of the tree, there is no difference to the way we call doFullRender and doPartialRender. They both accept the following parameters:
- The first parameter is the tree.
- The second parameter is optional and it is the anchor. If the anchor is not specified, the tree passed in the first parameter will replace the entire currently rendered tree. If the anchor is specified, the tree passed as parameter will be attached to the currently rendered tree at the same position as the node with the id referenced by
anchor. How the attachment is done is defined by the third parameter. - The third parameter is optional and it is the mode. If the mode is not defined, it is treated as
replaceComponent. There are four different modes:replaceComponent: replaces the node with the same id as the parameteranchor(or the root if no anchor is specified) with the tree passed in the first parameter.replace: replaces the children of the node with the same id as the parameteranchor(or the root if no anchor is specified) with the tree passed in the first parameter.prepend: pre-pends the tree passed in the first parameter to the children of the node with the same id as the parameteranchor(or the root if no anchor is specified).append: appends the tree passed in the first parameter to the children of the node with the same id as the parameteranchor(or the root if no anchor is specified).
Examples:
/* example 1: renders a container with an empty list */
beagleView.getRenderer().doFullRender({
  _beagleComponent_: 'beagle:container',
  children: [
    _beagleComponent_: 'custom:list',
    id: 'list',
  ],
})

/* example 2: adds a property to the root of the currently rendered tree */
const current = beagleView.getTree()
current.newProperty = 'new'
beagleView.getRenderer().doPartialRender(current)

/* example 3: adds an element to the "custom:list" inside the container */
const item = {
  _beagleComponent_: 'beagle:container',
  children: [
    { _beagleComponent_: 'beagle:text', text: 'Client name: Jasnah Kholin' },
    { _beagleComponent_: 'beagle:text', text: 'Client age: 30' }
  ]
}
// You should always do full renders when creating new nodes
beagleView.getRenderer().doFullRender(item, 'list', { mode: 'append' })
With the renderer API you get to alter the view whenever you want. You can’t, for instance, call renderer.doFullRender(tree, componentId) in the onInit of the Angular component with id componentId. If this is done, Beagle will remove a component of the tree before it even gets the chance to be fully rendered. Cases like this can happen using the Beagle Renderer inside components lifecycles, so be careful!
A solution to the example given would be to replace the children of the component instead of the component itself (renderer.doFullRender(tree, componentId, 'replace')).
The ViewContentManager API
List view component is a component that needs to use the Renderer API, but how do you access the renderer from the component itself? In both Angular and React this can be done via the ViewContentManager.
The ViewContentManager provides a way to access the Beagle View and the node in the current Beagle Tree that gave origin to the component being rendered and with that you can access the renderer and call re-renders for this specific component.
Accessing the ViewContentManager
React
The ViewContentManager can be accessed inside a React component if this component implements the BeagleComponent interface.
See below an example to re-render the component with a new set of children based on the data source and the template:
import React, { FC, useRef, useEffect, MutableRefObject } from 'react'
import { BeagleComponent } from '@zup-it/beagle-react'

interface ListViewInterface extends BeagleComponent {
  // ...
}

const ListView: FC<ListViewInterface> = (props) => {
  useEffect(() => {
    /* Once the component implements the BeagleComponent interface, we have access to the
    viewContentManager, but if the component was not instantiated by Beagle, the viewContentManager
    will be undefined. We must verify it before continuing. */
    if (!props.viewContentManager) return
    const children = createChildrenFromTemplate(props.dataSource, props.template)
    const element = props.viewContentManager.getElement()
    element.children = children
    props.viewContentManager.getBeagleView().getRenderer().doFullRenderer(element, element.id)
  }, [props.dataSource, props.template])

  return (
    // ...
  )
}
The re-render happens every time the data source or the template changes.
Angular
In Angular, if you need access to the ViewContentManager, the component class must extend BeagleComponent, then, you just need to reference this.viewContentManager.
import { Component, Input } from '@angular/core'
import { BeagleComponent } from '@zup-it/beagle-angular'

@Component({
  // ...
})
export class ListView extends BeagleComponent {
  // ...

  renderDataSource() {
    /* Checks if the viewContentManager is available. If the components has not been created by
    Beagle, it won't be. */
    if (!this.viewContentManager) return
    const children = this.createChildrenFromTemplate(this.dataSource, this.template)
    const element = this.viewContentManager.getElement()
    element.children = children
    this.viewContentManager.getBeagleView().getRenderer().doFullRenderer(element, element.id)
  }
}
The method renderDataSource should be called every time the data source or the template changes.
Using the ViewContentManager
The ViewContentManager have the following properties/functions
| Property | Type | Definition |
|---|---|---|
getElement() | function | returns the node in the Beagle Tree responsible for the renderization of the component. |
getElementId() | function | shortcut to getElement().id |
getBeagleView() | function | returns the BeagleView responsible for the view containing the component. |
Updating the view with the result of a request
In case you need to update the current view with a tree that comes from the backend, you should use the method fetch of the BeagleView. It will internally use all the cache mechanisms of Beagle and also do the rendering part.
Feedback
Was this page helpful?
Glad to hear it! Please tell us how we can improve.
Sorry to hear that. Please tell us how we can improve.