⚠️ Você está vendo a documentação da versão: v1.7
Beagle v1.7 não é mais mantida ativamente. A versão documentada que você está visualizando pode conter funcionalidades depreciadas. Para obter as funcionalidades mais recentes, consulte a nossa última versão .
Widget Customizado com Action
Atualmente no Beagle, o componente Text Input possue o comportamento de executar uma lista de ações. Para isso, ele expõe a propriedade onChange, a qual recebe a lista de ações que serão disparadas.
Neste tutorial veremos como criar um widget customizado com o comportamento de disparar uma lista de ações, iremos criar DatePicker um componente de selecionar data.
Passo 1: Criando componente custom no android
Na classe do seu componente vamos herdar de TextView e DatePickerDialog.OnDateSetListener.
class DatePickerComponent constructor(
    context: Context
) : TextView(context), DatePickerDialog.OnDateSetListener {

    private val myCalendar: Calendar = Calendar.getInstance()
    var dateSetListener: DateSetListener? = null

    init {
        this.setOnClickListener {
            DatePickerDialog(context, this, myCalendar
                .get(Calendar.YEAR), myCalendar.get(Calendar.MONTH),
                myCalendar.get(Calendar.DAY_OF_MONTH)).show()
        }
    }

    fun setText(text: String) {
        this.text = text
    }

    private fun Date.formatDate(): String{
        val myFormat = "yyyy-MM-dd"
        val simpleDateFormat = SimpleDateFormat(myFormat, Locale.US)
        return simpleDateFormat.format(this).toString()
    }

    override fun onDateSet(view: DatePicker?, year: Int, month: Int, dayOfMonth: Int) {
        myCalendar[Calendar.YEAR] = year
        myCalendar[Calendar.MONTH] = month
        myCalendar[Calendar.DAY_OF_MONTH] = dayOfMonth
        dateSetListener?.onDateSet(myCalendar.time.formatDate())
    }

}

interface DateSetListener{
    fun onDateSet(value: String)
}
Como podemos ver temos alguns métodos na classe, aqui abaixo vou explicar detalhado.
No método init está a configuração de clique, quando o usuário clicar no texto irá exibir o calendário para selecionar a data.
init {
        this.setOnClickListener {
            DatePickerDialog(context, this, myCalendar
                .get(Calendar.YEAR), myCalendar.get(Calendar.MONTH),
                myCalendar.get(Calendar.DAY_OF_MONTH)).show()
        }
    }
O método setText responsável por exibir o texto para usuário clicar, exemplo clique aqui para selecionar uma data.
fun setText(text: String) {
        this.text = text
    }
O próximo método é uma Extension functions responsável por formatar a data.
private fun Date.formatDate(): String{
        val myFormat = "yyyy-MM-dd"
        val simpleDateFormat = SimpleDateFormat(myFormat, Locale.US)
        return simpleDateFormat.format(this).toString()
    }
Este método veio da interface DatePickerDialog.OnDateSetListener e ele é responsável por pegar a data selecionada pelo usuário.
- Através deste método vamos passar o valor que o usuário selecionou para o método da interface do nosso componente
dateSetListener?.onDateSet(myCalendar.time.formatDate())
override fun onDateSet(view: DatePicker?, year: Int, month: Int, dayOfMonth: Int) {
        myCalendar[Calendar.YEAR] = year
        myCalendar[Calendar.MONTH] = month
        myCalendar[Calendar.DAY_OF_MONTH] = dayOfMonth
        dateSetListener?.onDateSet(myCalendar.time.formatDate())
    }
Passo 2: Registrando componente no beagle
Crie uma classe e sobre o nome coloque a anotação @RegisterWidget e herde da classe WidgetView()
- Implemente o método
buildViewque veio da classeWidgetView() - Nesta classe vamos adicionar dois atributos:
dateesse atributo responsável por apresentar o valor da data selecionada.onChangeesse atributo responsável por pegar o valor da data selecionado
@RegisterWidget
class DatePicker(
    val date: Bind<String>,
    val onChange: List<Action>
) : WidgetView() {

    override fun buildView(rootView: RootView) = DatePickerComponent(rootView.getContext()).apply {

        observeBindChanges(rootView, this, date) { text ->
            text?.let { setText(it) }
        }

        dateSetListener = object : DateSetListener {
            override fun onDateSet(value: String) {
                this@DatePicker.handleEvent(
                    rootView,
                    this@apply,
                    onChange,
                    ContextData(
                        id = "onChange",
                        value = value
                    )
                )
            }
        }
    }
}
Este bloco de código fica observando o atributo date, quando alterar o valor, ele adiciona o novo valor.
observeBindChanges(rootView, this, date) { text ->
            text?.let { setText(it) }
        }
Já esse bloco de código tem a interface do nosso componente, onde ele sobrescreve o método onDateSet que contém o valor da data selecionada pelo usuário. Através desse valor vamos criar um ContextData com id onChange e o value será o value retornado pelo método da interface.
- E para pegar o valor atualizado da data, basta usar a expressão
@{onChange}. Na Etapa abaixo veremos como pegar esse valor do onChange.
dateSetListener = object : DateSetListener {
            override fun onDateSet(value: String) {
                this@DatePicker.handleEvent(
                    rootView,
                    this@apply,
                    onChange,
                    ContextData(
                        id = "onChange",
                        value = value
                    )
                )
            }
        }
Passo 3: Usando componente em uma tela
Usando o kotlin declarativo do beagle criamos uma tela, onde adicionamos o componente DatePicker e abaixo um texto.
Abaixo um exemplo usando o componente.
Container(
    context = ContextData(
        id = "ctx",
        value = "Escolha uma data"
    ),
    children = listOf(
            DatePicker(
                date = expressionOf("@{ctx}"),
                onChange = listOf(
                SetContext(
                    contextId = "ctx",
                    value = "@{onChange}"
                )
            )
        ),
            Text(text = expressionOf("@{ctx}"))
        )
    )
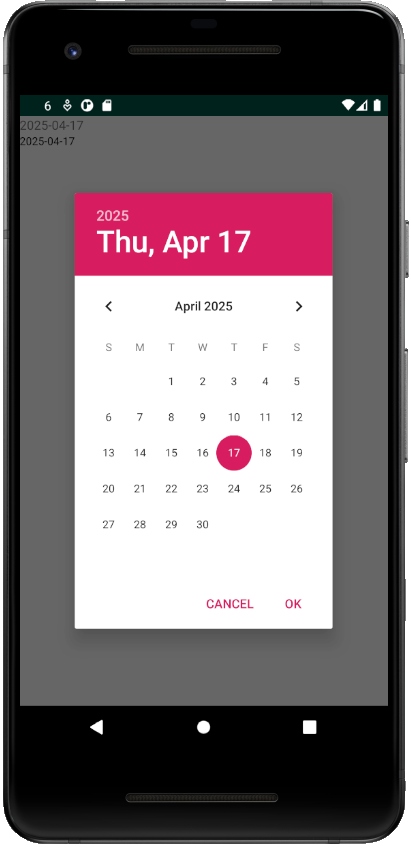
Abaixo um exemplo no emulador.
Feedback
Was this page helpful?
Glad to hear it! Please tell us how we can improve.
Sorry to hear that. Please tell us how we can improve.