Widget Customizado com Action
Atualmente no Beagle, o componente Text Input possue o comportamento de executar uma lista de ações. Para isso, ele expõe a propriedade onChange, a qual recebe a lista de ações que serão disparadas.
Neste tutorial você verá como criar um widget customizado com o comportamento de disparar uma lista de ações, iremos criar DatePicker um componente de selecionar data.
Passo 1: Criando componente custom no android
Na classe do seu componente vamos herdar de TextView e DatePickerDialog.OnDateSetListener.
class DatePickerComponent constructor(
    context: Context
) : TextView(context), DatePickerDialog.OnDateSetListener {

    private val myCalendar: Calendar = Calendar.getInstance()
    var dateSetListener: DateSetListener? = null

    init {
        this.setOnClickListener {
            DatePickerDialog(context, this, myCalendar
                .get(Calendar.YEAR), myCalendar.get(Calendar.MONTH),
                myCalendar.get(Calendar.DAY_OF_MONTH)).show()
        }
    }

    fun setText(text: String) {
        this.text = text
    }

    private fun Date.formatDate(): String{
        val myFormat = "yyyy-MM-dd"
        val simpleDateFormat = SimpleDateFormat(myFormat, Locale.US)
        return simpleDateFormat.format(this).toString()
    }

    override fun onDateSet(view: DatePicker?, year: Int, month: Int, dayOfMonth: Int) {
        myCalendar[Calendar.YEAR] = year
        myCalendar[Calendar.MONTH] = month
        myCalendar[Calendar.DAY_OF_MONTH] = dayOfMonth
        dateSetListener?.onDateSet(myCalendar.time.formatDate())
    }

}

interface DateSetListener{
    fun onDateSet(value: String)
}
Você pode ver alguns métodos na classe, veja abaixo mais detalhes.
No método init está a configuração de clique, quando o usuário clicar no texto irá exibir o calendário para selecionar a data.
init {
        this.setOnClickListener {
            DatePickerDialog(context, this, myCalendar
                .get(Calendar.YEAR), myCalendar.get(Calendar.MONTH),
                myCalendar.get(Calendar.DAY_OF_MONTH)).show()
        }
    }
O método setText responsável por exibir o texto para usuário clicar, exemplo clique aqui para selecionar uma data.
fun setText(text: String) {
        this.text = text
    }
O próximo método é uma Extension functions responsável por formatar a data.
private fun Date.formatDate(): String{
        val myFormat = "yyyy-MM-dd"
        val simpleDateFormat = SimpleDateFormat(myFormat, Locale.US)
        return simpleDateFormat.format(this).toString()
    }
Este método veio da interface DatePickerDialog.OnDateSetListener e ele é responsável por pegar a data selecionada pelo usuário.
- Através deste método vamos passar o valor que o usuário selecionou para o método da interface do nosso componente
dateSetListener?.onDateSet(myCalendar.time.formatDate())
override fun onDateSet(view: DatePicker?, year: Int, month: Int, dayOfMonth: Int) {
        myCalendar[Calendar.YEAR] = year
        myCalendar[Calendar.MONTH] = month
        myCalendar[Calendar.DAY_OF_MONTH] = dayOfMonth
        dateSetListener?.onDateSet(myCalendar.time.formatDate())
    }
Passo 2: Registrando componente no beagle
Crie uma classe e sobre o nome coloque a anotação @RegisterWidget e herde da classe WidgetView()
- Implemente o método
buildViewque veio da classeWidgetView() - Nesta classe vamos adicionar dois atributos:
dateesse atributo responsável por apresentar o valor da data selecionada.onChangeesse atributo responsável por pegar o valor da data selecionado.
@RegisterWidget
class DatePicker(
    val date: Bind<String>,
    val onChange: List<Action>
) : WidgetView() {

    override fun buildView(rootView: RootView) = DatePickerComponent(rootView.getContext()).apply {

        observeBindChanges(rootView, this, date) { text ->
            text?.let { setText(it) }
        }

        dateSetListener = object : DateSetListener {
            override fun onDateSet(value: String) {
                this@DatePicker.handleEvent(
                    rootView,
                    this@apply,
                    onChange,
                    ContextData(
                        id = "onChange",
                        value = value
                    )
                )
            }
        }
    }
}
Este bloco de código fica observando o atributo date, quando alterar o valor, ele adiciona o novo valor.
observeBindChanges(rootView, this, date) { text ->
            text?.let { setText(it) }
        }
Já esse bloco de código tem a interface do nosso componente, onde ele sobrescreve o método onDateSet que contém o valor da data selecionada pelo usuário. Através desse valor vamos criar um ContextData com id onChange e o value será o value retornado pelo método da interface.
- E para pegar o valor atualizado da data, basta usar a expressão
@{onChange}. Na etapa abaixo você verá como pegar esse valor do onChange.
dateSetListener = object : DateSetListener {
            override fun onDateSet(value: String) {
                this@DatePicker.handleEvent(
                    rootView,
                    this@apply,
                    onChange,
                    ContextData(
                        id = "onChange",
                        value = value
                    )
                )
            }
        }
Passo 3: Usando componente em uma tela
Usando o Kotlin declarativo do Beagle uma tela foi criada e o componente DatePicker foi adicionado e abaixo um texto.
Veja um exemplo usando o componente:
Container(
    context = ContextData(
        id = "ctx",
        value = "Escolha uma data"
    ),
    children = listOf(
            DatePicker(
                date = expressionOf("@{ctx}"),
                onChange = listOf(
                SetContext(
                    contextId = "ctx",
                    value = "@{onChange}"
                )
            )
        ),
            Text(text = expressionOf("@{ctx}"))
        )
    )
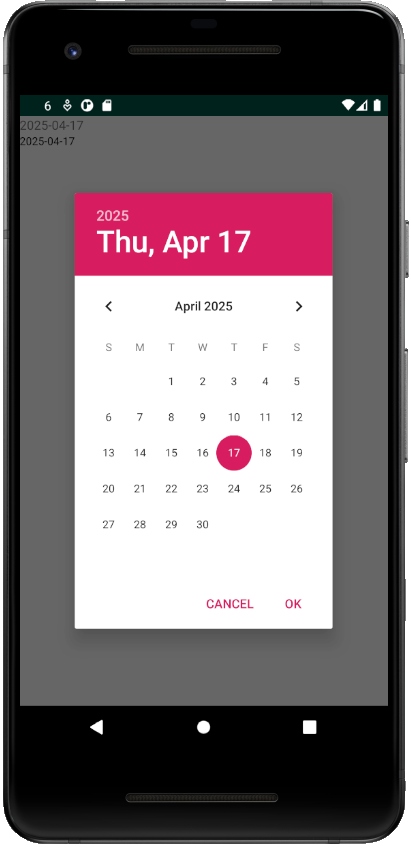
Veja um exemplo no emulador:
Feedback
Was this page helpful?
Glad to hear it! Please tell us how we can improve.
Sorry to hear that. Please tell us how we can improve.